2016년 10월 28일 금요일

인라인 어셈블

c코드 안에 어셈블리어를 쓰는 방식
ARM 아키텍처 환경(라즈베리파이)에서 테스트 해보았다.
gcc -o asm asm.c 로 하면 컴파일이 잘 되고 결과도 잘 나옴.

[코드]

#include <stdio.h>

int  asm_bic_ex ( int x, int y);

asm(" \n\
.global asm_bic_ex \n\
asm_bic_ex: \n\
bic r0, r0, r1 \n\
mov pc, lr     \n\
");

int main ( void )
{
int  bic;

printf("\n+-------------------+\n");
printf("|ARMInstruction BIC|\n");
printf("+-------------------+\n\n");

bic = asm_bic_ex( 0x1111, 0x1010);        

printf("cpsr = %08X\n\n", bic );

return 0;
}

[결과]


출처
ARM 명령어를 배워보자(19) : bic
http://forum.falinux.com/zbxe/index.php?document_srl=572163&mid=lecture_tip

어셈블리 코드로 함수만들고 컴파일


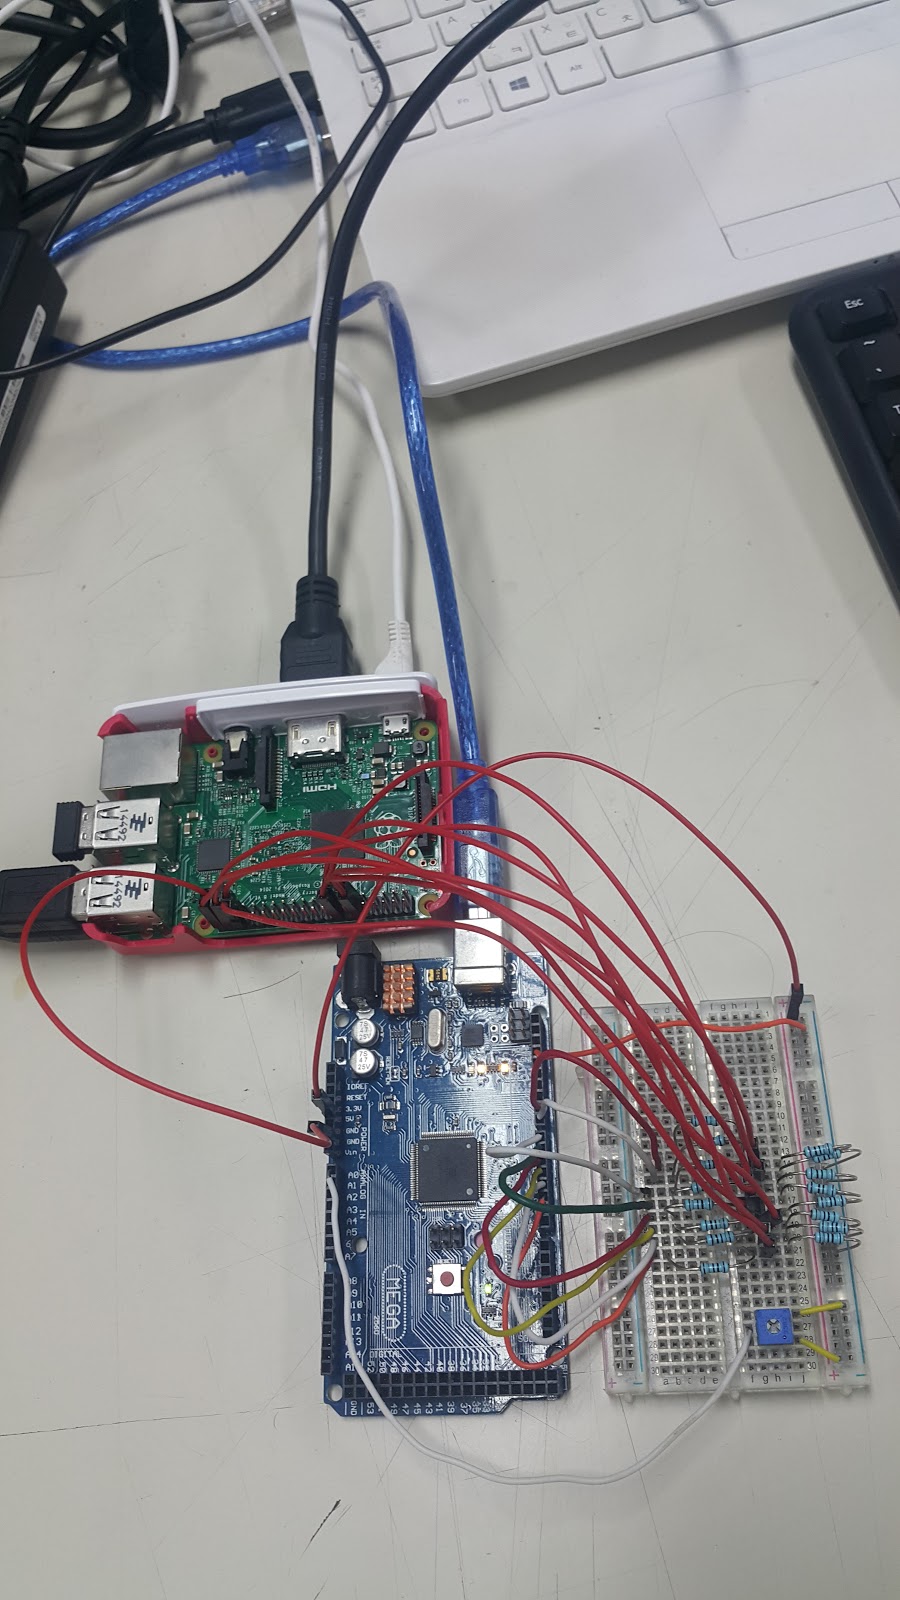
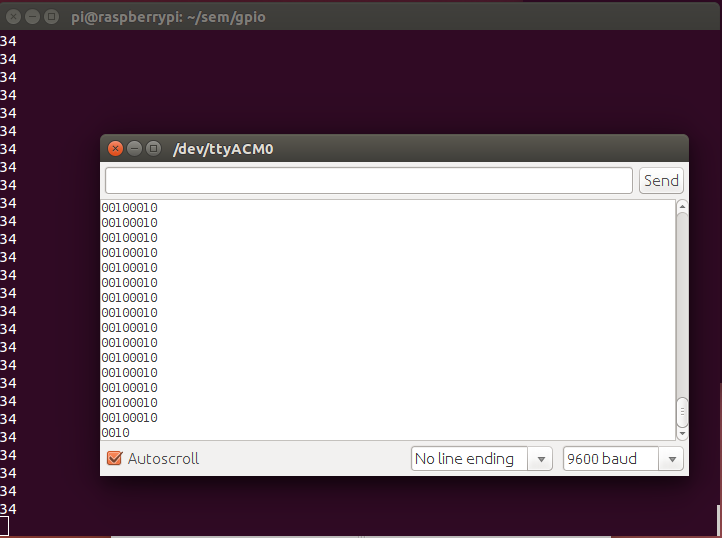
라즈베리파이의 GPIO 인터럽트를 disable을 하는 방법을 찾던 중에 라즈베리파이에서 asambly languge를 써서 함수를 만들어서, 이 함수를 c언어로 쓴 프로그램에서 사용하는 방법을 써보았다. 이 방법을 사용해서 인터럽트를 disable하는 것은 실패했지만 asambly어를 사용했다는 점과 이것을 c언어로 작성한 프로그램과 합쳤다는 점에서 기록할 만하다.

c코드 main문에 disable()과 enable() 함수는 어셈블리어로 만들었다. 왜냐하면 내부 레지스터를 건드려야 하기 때문에.

c코드(interrupt.c):
//the program for detecting interrupt of falling edge and rising edge on the gpio pin.
#include <stdio.h>
#include <string.h>
#include <errno.h>
#include <stdlib.h>
#include <wiringPi.h>


#define S_P_SIGNAL_PIN1 7
#define S_P_SIGNAL_PIN2 25

void startISR(void) {
   printf("falling edge detected\n");
}

void stopISR(void) {
   printf("rising edge detected.\n");
}

int main(void) {
  // sets up the wiringPi library
  if (wiringPiSetup () < 0) {
      fprintf (stderr, "Unable to setup wiringPi: %s\n", strerror (errno));
      return 1;
  }


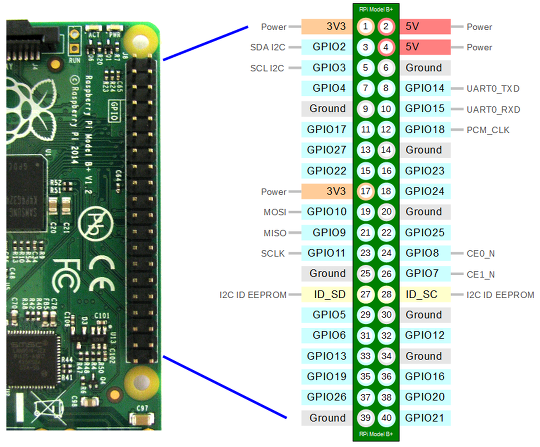
  // set Pin 17/0 generate an interrupt on high-to-low transitions
  // and attach myInterrupt() to the interrupt
  if ( wiringPiISR (S_P_SIGNAL_PIN1, INT_EDGE_FALLING, &startISR) < 0 ) {
      fprintf (stderr, "Unable to setup ISR: %s\n", strerror (errno));
      return 1;
  }

  if ( wiringPiISR (S_P_SIGNAL_PIN2, INT_EDGE_RISING, &stopISR) < 0 ) {
      fprintf (stderr, "Unable to setup ISR: %s\n", strerror (errno));
      return 1;
  }

  while ( 1 ) {
    printf("interrupt disable------\n");
disable();
delay(1000);
printf("interrupt enable------\n");
enable();
delay(1000);
  }

  return 0;
}

어셈블리 코드(interruptASM.s):
//코드 출처: http://embedded-xinu.readthedocs.io/en/latest/arm/ARM-Interrupt-Handling.html#disable
/**
 * @file intutils.S
 *
 * Functions to enable, disable, or restore global interrupts on the ARM.
 *
 * See http://xinu-os.org/Interrupt_handling_(ARM) for more information.
 */
/* Embedded Xinu, Copyright (C) 2013.  All rights reserved. */

.globl enable
.globl disable
.globl restore

/**
 * @fn void enable(void)
 *
 * Enable interrupts globally.
 */
enable:
.func enable
cpsie i
mov pc, lr
.endfunc

/**
 * @fn irqmask disable(void)
 *
 * Disable interrupts globally and returns the old state.
 * @return state of interrupts before they were disabled
 */
disable:
.func disable
mrs r0, cpsr
cpsid i
mov pc, lr
.endfunc

/**
 * @fn irqmask restore(irqmask)
 *
 * Restores the global interrupt mask to a previous state.
 * @param im
 *     irqmask of interrupt state to restore
 * @return state of interrupts when called
 */
restore:
.func restore
msr cpsr_c, r0
mov pc, lr
.endfunc


gcc -c interrupt.c
as -o interruptASM.o interruptASM.s
gcc -o interrupt interrupt.o interruptASM.o
sudo ./interrupt


참고
ARM assambler in Raspberry Pi:
http://thinkingeek.com/2013/01/09/arm-assembler-raspberry-pi-chapter-1/

인터럽트

헤더파일 <avr/io.h>:
헤더파일 "avr/io.h"를 첨부하면 모든 레지스터 명과 그의 각 비트명이 포함됩니다.
***예를 들어 레지스터명 EIMSK는 unsigned char형 변수처럼 사용할 수 있습니다.
***또한 EIMSK레지스터에 대해 각 비트명은 다음 매크로로 정의되어 있습니다.
#define INT0 0
#define INT1 1
#define INT2 2
...
따라서 EIMSK의 INT2 비트를 1로 세트하려면 다음과 같이 하면됨니다.
EIMSK = 0b00000100    <=> 1<<2 <=>      1<<INT2
다수의 비트를 1로 세트할 때는 비트별 OR 연산자를 사용합니다.
0b00010100   <=>      (0b00000100)|(0b00010000)   <=> (1<<2)|(1<<4)    <=>      (1<<INT2)|(1<<INT4)
EIMSK의 각 비트 중 INT2와 INT4를 세트하고 나머지 비트는 원래 값을 보존
EIMSK = EIMCK | ((1<<INT2)|(1<<INT4));  <=>   EIMSK }= ((1<<INT2)|(1<<INT4));
EIMSK의 각 비트 중 INT2와 INT4를 0으로 리셋, 나머지 비트는 원래값을 보존할 때는 AND 연산자를 사용합니다.
0b11101011 <=> ~(0b00010100) <=> ~((1<<INT2)|(1<<INT4))
EIMSK &= ~((1<<INT2)|(1<<INT4));
헤더파일 <avr/interrupt.h>:
winAVR에서는 헤더파일 "avr/interrupt.h"를 포함하는데, 이는 인터럽트 관련 함수와 인터럽트 서비스루틴을 수행할 수 있습니다.
-다음 함수를 호출하면 인터럽트를 허용/금지 할 수 있음.
sei();//인터럽트 허용
cli(); //인터럽트 금지
인터럽트의 개념:
인터럽트란 무엇일까요??
인터럽트는 어떤 사건이 발생하면 미리 지정된 위치로 분기하여 인터럽트를 처리하고, 처리가 끝나면 인터럽트 코드로 분기하기 전의 위치로 복귀하여 작업을 계속 수행합니다.
일반적인 함수의 경우, 작업수행 중 다른 곳으로 분기한다는 면에서 인터럽트와 유사하지만.. 함수의 호출은 코드의 순서대로 진행하기 때문에 언제 분기할 지 사용자가 명확히 알고있습니다.
하지만 인터럽트는 발생시키는 사건은 언제 발생할 지 모르는 불확정적인 것입니다.
인터럽트 처리 과정에 대해서 알아보겠습니다.
특정 인터럽트가 발생하면 미리 정해진 주소로 분기를 합니다. 이 주소의 메모리에는 사용자가 작성한 인터럽트 서비스루틴 ISR()로 분기하라는 어셈블리 명렁 JMP isr이 저장되어 있습니다.
ISP()을 수행한 후에는, 인터럽트로 인해 중단되었던 지점으로 돌아옵니다.
각 인터럽트에는 고유한 번호가 있는데 이를 벡터라고 합니다.
지정된 인터럽트가 걸렸을 경우 앞에서 말했던 미리 정해진 주소로 분기를 하고, 그 주소로 이동하면 사용자가 작성한 해당 인터럽트 서비스루틴으로 분기 할 수 있도록 하는 주소가 있습니다.
각 인터럽트에 대해 벡터가 2워드씩 메모리 할당이 되어 있습니다.
인터럽트 서비스 루틴:
인터럽트 서비스 루틴이란 인터럽트를 처리하는 코드를 말합니다.
winAVR 컴파일러에서는 다음과 같이 인터럽트 서비스 루틴을 작성합니다.
1
2
3
4
5
#include <avr/interrupt.h> //인터럽트 헤더 파일
ISR(vector)
{
   //여기에 인터럽트 서비스 작업 코드를 삽입할 것
}
인터럽트 서비스 루틴은 일반 함수와는 다르게 인터럽트 벡터 외에 어떠한 정보도 인자로 전달할 수 없습니다.
또한 인터럽트 서비스 루틴은 반환 값이 없는 void형으로 작성합니다.
인자인 vector은 아래 표에 나오는 정해진 매크로를 사용합니다.
전체 인터럽트의 허용/금지:
오른쪽 스위치는 모든 인터럽트를 허용하고 금지시키는 스위치 입니다.
오른쪽 스위치를 열고 닫는 함수가,
인터럽트를 허용할 때는 sei();
인터럽트를 금지할 때는 cli();
또한 왼쪽 스위치처럼 각 인터럽트를 개별적으로 허용/금지 할 수 있는데, 이에 대해서는 레지스터로 처리합니다.
인터럽트 관련 레지스터:
1) 외부 인터럽트 마스크 레지스터(External Interrupt Mask Registar):
EIMSK
EIMSK는 개별적으로 인터럽트를 허용하는 전역으로 인터럽트가 허용되었을 때, 레지스터로 비트n을 세트하면 외부인터럽트 INTn이 허용됩니다.
반대로 리셋하면 해당 인터럽트는 금지됩니다.
2) 외부 인터럽트 제어 레지스터A(External Interrupt Control Register A):
EICRA

아래 표와같이 외부 인터럽트 0~3까지의 인터럽트 감지방법을 제어합니다.
3) 외부 인터럽트 제어 레지스터 B(External Interrupt Control Register B):
EICRB
외부 인터럽트 4~7까지의 인터럽트 감지방법을 제어합니다.
인터럽트 핀:
ATmega128은 8개의 외부 인터럽트 INT0~INT7을 제공합니다.
인터럽트를 사용할 때 INTn 핀의 방향은 입력으로 설정해야 합니다.
그리고 인터럽트를 사용하더라도 공유하는 입출력 핀을 읽으면 인터럽트의 신호의 상태를 알 수 있습니다.
실습:​
실습을 위해 다음과 같이 연결합니다.
코드:
1
2
3
4
5
6
7
8
9
10
11
12
13
14
15
16
17
18
19
20
21
22
#include <avr/io.h>
#include <avr/interrupt.h>
ISR(INT0_vect)
{
   PORTA<<=1;
   if(PORTA == 0x00)
       PORTA = 0xFF;
}
int main(void)
{
   DDRA = 0xFF;
   DDRD = 0x00;
   PORTA = 0xFF;
   sei(); //전역 인터럽트 허용
   EIMSK = (1<<INT0); // INT0 허용
   EICRA = (2<<ISC00);  //하강에지 트리거
   while(1);
}


2016년 10월 27일 목요일

GPIO 레지스터 건드레서 병렬 데이터 받기

[라즈베리파이가 0~255 밝기값 받기 ]
3.png
Screenshot from 2016-09-03 20:34:38.png


아두이노
라즈베리파이
2
16
3
17
4
18
5
19
6
20
7
21
8
22
9
23
GND
GND
* 아두이노 A0에 가변저항 연결
* 라즈베리파이의 핀 번호는 BCM 핀번호 표현을 따른 것임.


20160903_230256_001.jpg


아두이노 코드
int analogPin = 0;// potentiometer wiper (middle terminal) connected to analog pin 3
int digitalPin[] = {2,3,4,5,6,7,8,9};// outside leads to ground and +5V
int val = 0;           // variable to store the value read
char val_8b = 0;
int j = 0;


void setup()
{
 for(j=0; j<8; j++)
   pinMode(digitalPin[j], OUTPUT);
 
 Serial.begin(9600);          //  setup serial
}


void printBit(){
 int i = 0;
 
 for(i = 7; i>=0; i--){
   int bitVal = bitRead(val_8b, i);
   digitalWrite(digitalPin[i], bitVal);
   Serial.print(bitVal);
 }
   Serial.println();
 
}

void loop()
{
 val = analogRead(analogPin);  
 val_8b = val/4;  // read the input pin
// Serial.println(val_8b, HEX);             // debug value
 
 printBit();
 
 delay(100);
}


라즈베리파이 코드
 1 #include <stdlib.h>
 2 #include <stdio.h>
 3 #include <sys/types.h>
 4 #include <sys/stat.h>
 5 #include <fcntl.h>
 6 #include <sys/mman.h>
 7
 8 #define GPIO_BASE 0x3F200000
 9 #define GPLEV0 0x34
10
11 int main()
12 {
13     int fd = open("/dev/mem", O_RDWR|O_SYNC);
14     if(fd<0){
15         printf("can't open /dev/mem \n");
16         exit(-1);
17     }
18
19     char *gpio_memory_map = (char*)mmap(0, 4096, PROT_READ|PROT_WRITE, MAP_S    HARED, fd, GPIO_BASE);
20
21     if(gpio_memory_map == MAP_FAILED)
22     {
23         printf("ERROR: mmap\n");
24         exit(-1);
25     }
26
27     volatile unsigned int* gpio = (volatile unsigned int*)gpio_memory_map;
28
29     while(1)
30     {
31         int input = gpio[GPLEV0/4] & (0xFF<<16);
32
33         input = input >> 16;
34         input = input & 0xFF;
35         printf("%d\n", input);
36
37         delay(100);
38     }
39
40     munmap(gpio_memory_map, 4096);
41
42
43
44
45     return 0;
46 }


Screenshot from 2016-09-03 22:53:28.png


clear images were obtained